Tuesday, July 12, 2022

Lori Whitlock July Blog Hop


 Hello crafty friends and welcome to the July Lori Whitlock blog hop!

Sweet summertime is here, and I love it! I am also loving making some fun summer projects like this one. This is the Box Card Lemonade Glass (Lori's SVG, Silhouette). It is an older cut file but still looks fun and fabulous made with the Endless Summer collection!


Don't forget to get your free file and enter to win a gift certificate!


Visit the Lori Whitlock store for 30% off your entire purchase!


a Rafflecopter giveaway

Your next stop is to Ashley's blog! 

If you are looking to start at the beginning here is the full list...

Monday, June 20, 2022

4th of July Treat Box


Hello crafty friends! Today I have a couple of adorable 4th of July treat boxes to share. When it comes to Lori's cut files, my favorite thing to do is pair cut files . Today's example is the Ribbon Tie Favor Box Scalloped (SVG, Silhouette) paired with the heart from the A2 4th of July Card (SVG, Silhouette). I love the heart from the card file but didn't really want a card. I wanted to make some treat boxes for the kids when we go to our neighbor's 4th of July party so I took the heart and sized it down to fit the side panel of the box. The boxes by themselves are cute but I love how they turned out with the hearts on them!


I also want to point out that all of the papers I used are from the Fun on The Farm collection. The red, white, and blue papers jumped out at me the first time looking through the collection and I knew I had to make my 4th of July projects with it!

Thanks for stopping by today!

Aimee


Tuesday, June 14, 2022

Lori Whitlock June Blog Hop


 Hello crafty friends and welcome to the June Lori Whitlock blog hop!

Today I have for you the new 5x7 Box Card Dad Office (Lori's SVG, Silhouette). Father's Day is coming up this weekend and you know Dad loves homemade cards! So, if you're looking for a sweet card for Dad then check all of the wonderful Father's Day cards by Lori. 

This card is perfect for those techy-type dads who love all the technology. It has 4 great layers...computer and coffee, Dad (in his amazing plaid shirt!), his computer chair, and the office wall behind. It is sure to be a hit!


Don't forget to get your free file and enter to win a gift certificate!


Visit the Lori Whitlock store for 30% off your entire purchase!


a Rafflecopter giveaway


Your next stop is to Ashley's blog! 

If you are looking to start at the beginning here is the full list...

Wednesday, June 8, 2022

Box Card Pig Barn


Hello crafty friends! I'm here with you today sharing what I think is one of Lori's cutest cards EVER!! This is the 5X7 Box Card Pig Barn (Lori's SVG, Silhouette) and I have to be honest about how much I fell in love with this little piggy while I was making him. He is sure to brighten anyone's day with his sweet little face. Have a friend or family member who needs a little pick me up? Then look no further than this card. It folds flat so he travels nicely through hand or through mail.


Most papers used are from the new Fun on The Farm collection and I think it adds so much more cuteness to the card! And I feel like I need to point out that I accidently flipped my paper the wrong way while cutting and had to horizontally flip the entire card (minus the chicken and pail) so if you noticed it looked different, that's why. Lol!

Thanks for stopping by today!

Aimee


Thursday, May 26, 2022

Father's Day Apron Box Card


Hello crafty friends and welcome to another Thursday tutorial! Today I want to give a quick little walk through on how to assemble the adorable Apron Box Card Father's Day card (Lori's SVG, Silhouette). With Father's Day right around the corner, this is a great addition to your gift to show your appreciation to Dad! You can't really tell from pictures but that "Best Dad Ever" piece on the front is a pocket which will hold a gift card to any of Dad's favorite stores.


So, let's get started making this awesome box card!

First is to gather your papers and cut out all of the pieces. That lovely red bandana print? That's from the new collection called Fun On The Farm and I thought it perfect for this card!


Next step is to adhere all of the extra pieces to the main pieces of the project.


Now fold on all of the perforated lines.


Adhere the pocket to the front of the card. Make sure that you adhere it to the side with the holes at the top of the apron.


Next adhere the box side tab together.


Now you will want to adhere the "tools" piece to the inside of the apron box.


And lastly, you will want to decorate your box card. I choose to add some black grosgrain ribbon to the top holes of the apron box. Now it's ready to give to Dad!


Thanks for stopping by today! Hope you enjoyed my small tutorial and give it a go...Dad will love it!

Aimee


Tuesday, May 10, 2022

Lori Whitlock May Blog Hop


 Hello crafty friends and welcome to the May Lori Whitlock blog hop!

Mother's Day has come and gone but Moms deserve gifts anytime of the year! If you have a mom who loves her tea then this sweet little gift box, the Valentine Tea Favor Box (Lori's SVG, Silhouette) will be the perfect way to gift her some tea bags or any gift.


To keep it looking realistic, I did not adhere the tea bag label down. It's just hanging on the side of the cup just like it would with a real cup of tea.

Don't forget to get your free file and enter to win a gift certificate!


Visit the Lori Whitlock store for 30% off your entire purchase!


a Rafflecopter giveaway

Your next stop is to Ashley's blog! 

If you are looking to start at the beginning here is the full list...

Monday, April 25, 2022

Spring Flower Card


Hello crafty friends! Who's enjoying the Spring? I know I am. I am also enjoying the new set of beautiful flower cards from Lori. Today I am showing off the new A7 Flower Card 2 (Lori's SVG, Silhouette). 


This card was fun to put together with all of the beautiful flowers and bow. On the bow, I only adhered the center and lifted up on the edges to give some dimension. I also added a panel to the card by cutting a piece of pattern paper that is 1/8" inch smaller on each side. I added a "oh happy day" sentiment to the card but with a different sentiment this could easily turn into a lovely Mother's Day card!

Thanks for stopping by today!

Aimee


Tuesday, April 12, 2022

Lori Whitlock April Blog Hop


 Hello crafty friends and welcome to the April Lori Whitlock blog hop! Hope everyone is enjoying the hop! Today I have the Hexagon Pop Up Card Easter Crosses (Lori's SVG, Silhouette) which is so beautiful! I am loving the crosses, the flowers, and the big sun burst in the background! I also love that these cards easily fold flat for mailing so that you can wish a loved one a beautiful and Happy Easter!


Don't forget to get your free file and enter to win a gift certificate!


Visit the Lori Whitlock store for 30% off your entire purchase!


a Rafflecopter giveaway

Your next stop is to Ashley's blog! 

If you are looking to start at the beginning here is the full list...

Thursday, March 31, 2022

Easter Rainbow Box


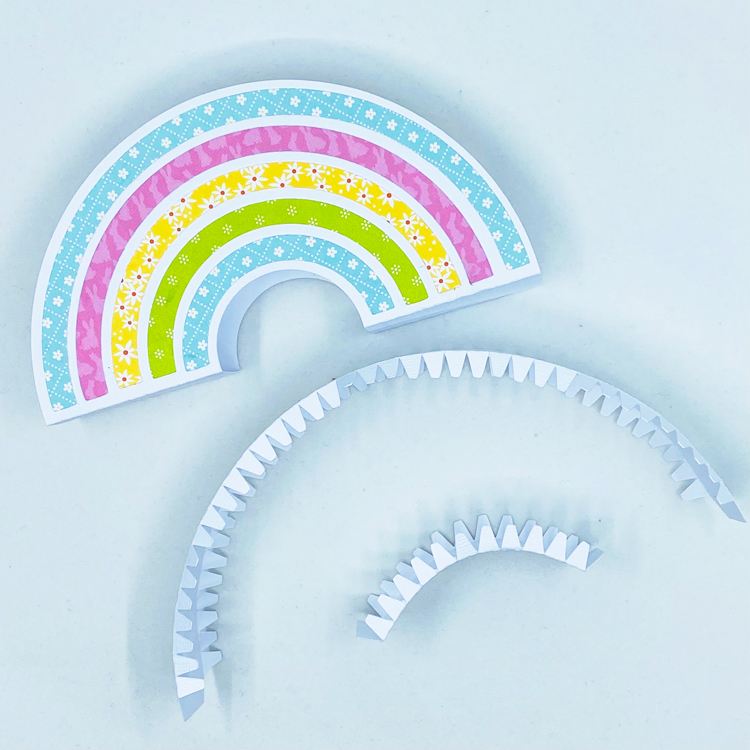
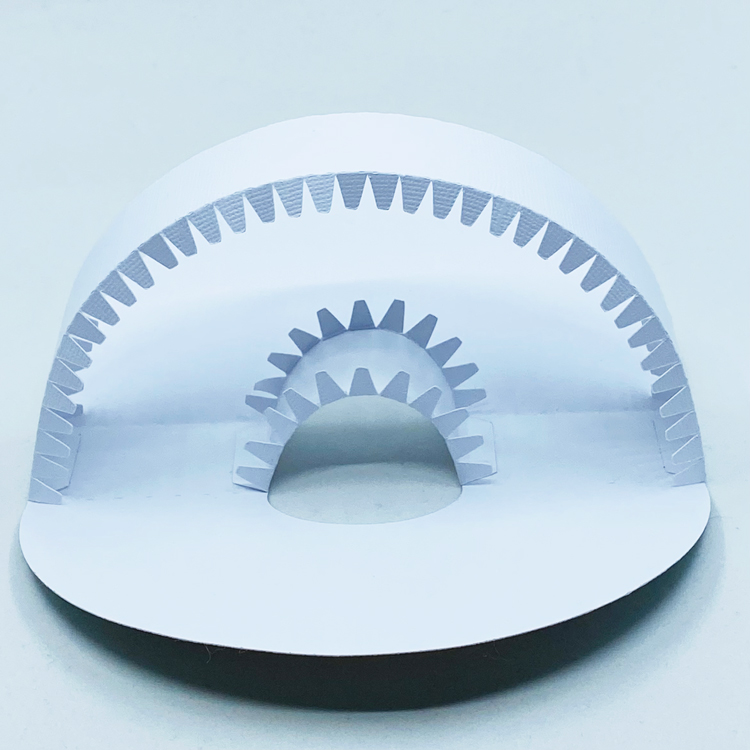
Hello crafty friends! I'm here with you and I want to share a tutorial today on the 3D Rainbow (Lori's SVG, Silhouette). And if you know me, then you know I'm always looking at the SVGs and thinking of other holidays/occasions to create the files for. The 3D Rainbow box I have for you today is for Easter but the file was originally created for St. Patrick's Day. I used the Lori Whitlock Spring Fling and Easter Wishes papers on this project and I think it turned out so very cute! The added flower stickers are from the Easter Stickers (Lori's SVG, Silhouette).

To start this project, let's get to cutting out the pieces in the file. While I had the project pulled up in my Silhouette design studio, I changed the colors to get an idea of how I wanted this project to look. I chose softer Easter colors. 


Here are the pieces cut out. I used a sturdy piece of white cardstock for the main box piece. If taken care of while storing, these pieces will last over the years! I still decorate my house with Lori Whitlock projects from a few years ago.
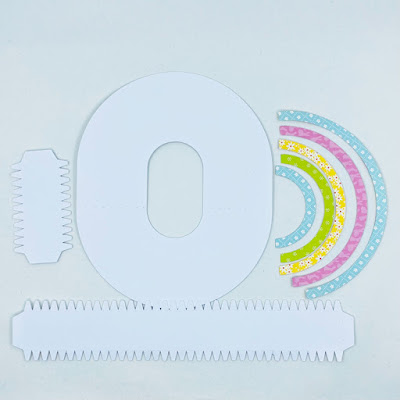
 

Next is to add the rainbow pieces. I find it easier to adhere these pieces down when the box is flat on my desk. To help with lining up the rainbow, I folded the box piece so I could see where the line is. Finish adhering all of the pieces down and we are ready to move onto the next step.


Next is putting the tabbed pieces on to make the actual box part of this project. First I conditioned the pieces to curve same as the box and then folded the tabbed pieces in.


I found it easiest to adhere the tabs down to the cardstock first.


Tip: Start with adhering the front first because of it being the most viewed side!! I adhered the front first so that I could move the pieces around with my fingers and get it just right. Now add dots of glue to the back side tabs to close the box up.


A little tip I have on keeping the front and back up while the glue is drying is to use little pieces of washi tape. The pieces of washi will come right up without tearing the paper.


After the glue is completely dry (and washi gone) it's time to have fun decorating your sweet little rainbow!


While working on this project, I was thinking it would look absolutely adorable on my mantle with my Easter bunnies or on my tiered tray over in the kitchen!

Thanks for stopping by today!


Tuesday, March 8, 2022

Lori Whitlock March Blog Hop


 Hello crafty friends and welcome to the March Lori Whitlock blog hop!

Today I want to share what you can make with the A2 Easter Bunny Face Shaped Card (Lori's SVG, Silhouette). Aren't these just the cutest?!?! One file in 3 different Easter colors.


I made these for a friend's children...she has 1 boy and 2 girls. So, on the blue boy bunny I snipped the eyelashes off to make it a little more masculine. I can't wait to give these along with a small bag of Easter candy!


Don't forget to get your free file and enter to win a gift certificate!


Visit the Lori Whitlock store for 30% off your entire purchase!


a Rafflecopter giveaway

Your next stop is to Ashley's blog! 

If you are looking to start at the beginning here is the full list...

Monday, February 28, 2022

Ghiradelli Box

Hello crafty friends...I'm here with you today to share this sweet (and I mean SWEET) little box! This is the 3 Ghiradelli Box Valentine (SVG, Silhouette). It is meant to hold 3 of the delicious Ghiradelli square chocolates and who wouldn't want that?!?! But you could also size this box up for some bigger sized goodies.


I also want to point out that this box can be stored flat. That means you could make a bunch of these for birthdays and just grab one when you need it. I plan on filling this one with some goodies for my hubby on our anniversary.

Thanks for stopping by today! 
Thursday, February 3, 2022

Valentine Candy Box Tutorial


Hello crafty friends! I have a tutorial on making these adorable Scallop Heart Candy Boxes (Lori's SVG Shop, Silhouette). These would be perfect for a grand/son or grand/daughter! I used the new Birthday Girl Collection and the Birthday Boy Collection to make these more kid friendly. I used the panda and the dog from the sticker sheet from each collection because who doesn't love an adorable animal wishing you a Happy Valentine's Day?!?!


Alright, let's get into this tutorial. First off, I want to point out that you will need to match up the correct heart to the correct side pieces. Heart piece 1 and side pieces 1 will be the top piece of the box and the heart piece 2 and side pieces 2 will be the bottom part of the box. This is very important as they are different sizes.


Now choose your papers and cut out all of the parts to this file and be sure to somehow label the hearts and side pieces. I used sticky notes to mark mine. Side note...looking at my picture below I think I mislabeled the side pieces. The longer side pieces will match up the heart 1.


Next you will want to adhere the 2 side pieces of each together. Put adhesive on the each of the tabs and adhere them together to form an oval.


Once the sides are dry...match up the pieces.


To make this part easier, use your fingers to shape the side pieces to match the heart shape. Then bend all of the triangle pieces down to the heart shape and adhere together. Do this for the top and bottom pieces of the box.


Here is a look at the box pieces when they are completely adhered together.


Now you will need to adhere the scalloped pieces to each of the top and bottom pieces of the box.


And then comes the fun part of decorating the front! For the red/dog heart I used the pieces that come with the file and for the pink/panda I made an extra larger heart to double up on the front panel. It's not necessary but I thought it would be cute.


That's all from me today. I hope you give this cute box a try! It's very fun to make and decorate!

Thanks for stopping by!

Aimee